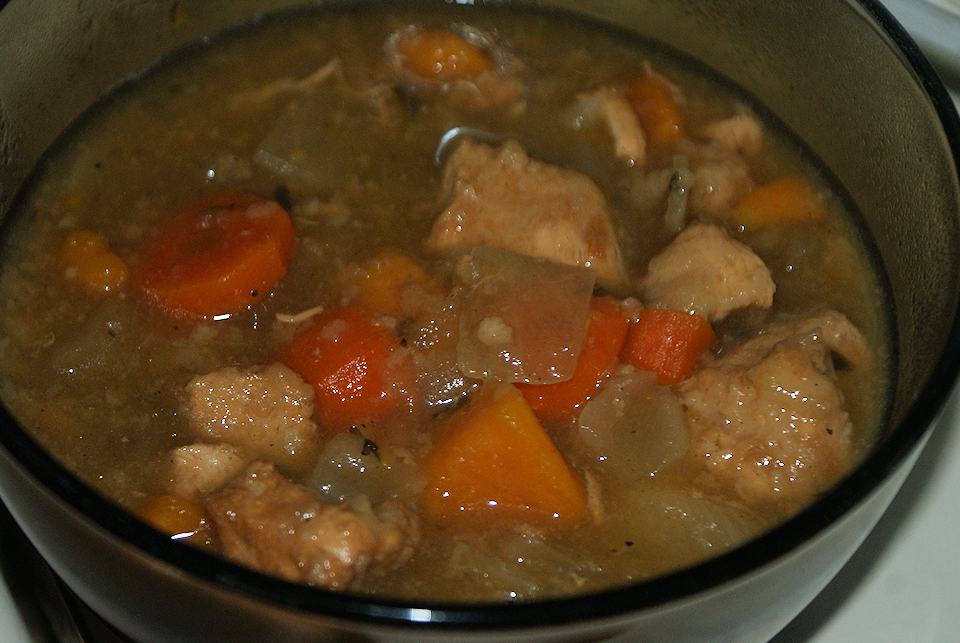
Category Archives: Gluten Free

Autumn Stew

Harvest Stew

Autumn Stew

Nothing says autumn like apples and apple cider, right?  This stew contains chicken, apples, cider, sweet potatoes and more.  And as an added bonus, it’s gluten free, so you can serve it to celiacs and those with wheat allergies.  And as an extra added bonus, it’s a slow cooker recipe, so you get to smell it cooking all day long.

Ingredients

  • 3 chicken breasts
  • 2 tablespoons potato starch
  • 2 tablespoons brown rice flour
  • 1/4 teaspoon garlic salt
  • 1 tablespoon oil
  • 1 cup apple cider
  • 4 cups chicken broth
  • 1 apple
  • 1 large onion
  • 1 large sweet potato
  • 4 carrots
  • 1 teaspoon ground thyme
  • 1/4 teaspoon pepper
  • 1/2 teaspoon salt
  • 1 tablespoon parsley flakes

Instructions

1. Add oil to a frying pan and heat to medium-high.  Cut the chicken in bite-sized pieces.  Mix the potato starch, brown rice flour, and garlic salt, and either sprinkle it over the chicken or put it in a bag and shake together with the chicken to thoroughly coat the pieces.

2. Place chicken in fry pan and cook, turning occasionally.

3. Cut all your veggies to bite-sized pieces.  The apple should be cut into small pieces.  (The apple will essentially disintegrate, most likely, which will tempt you to think you need larger chunks, but be warned: when I tried larger chunks, the resulting non-disintegrated apple chunks were similar in texture to…well…let’s not spoil the recipe by completing that thought. Plus, the apple chunks hold the heat more than anything else in the stew, so you really don’t want large chunks of apple floating around like land mines for your mouth!)

4. Add all the ingredients to the slow cooker and stir them together.  Set the slow cooker to LOW and cook all day (I aim for 8 hours).

We like our stew thick, so if at the end of the cooking I think it’s too thin, I make a slurry of potato starch or corn starch and mix it in.

Turn off the slow cooker and let the stew cool for a half-hour to an hour before serving.

Variation: Laura prefers this stew with sweet potatoes, but I like it better with regular potatoes.  Try it both ways, and let us know who you agree with!

Gluten-Free Peach-Raspberry Pie

Peach Raspberry Pie

Peach Raspberry Pie – Gluten Free

I’ve only attempted a gluten-free pie crust once.  The first time I tried a GF pie crust, it was so horribly messy to work with that I – like the raven – quoth, “Nevermore!”  (in truth, I’ll probably try it again some day, but for now I’m not wasting my time.)

But this pie is gluten free and simple.  In fact, the crust is poured.  Can’t get simpler than that, right?

Before you read further, a couple important disclaimers:

  • This pie has a custardy flavor, so if you’re not a fan of custard, walk away now.
  • I have a 9.5″ pie plate that I make this in, and it fills it right up; if you’re using a 9″, it probably will not be big enough, so you might want to back off the amount of peaches or raspberries you use, by a cup or so.

Ingredients

  • Filling
    • 2 peaches, cut in thin slices
    • 2 cups raspberries
    • 1 teaspoon cinnamon
  • Crust
    • 1/4 cup potato starch
    • 1/4 cup sorghum flour
    • 1/4 teaspoon baking powder
    • 1/4 teaspoon xanthan gum
    • 1/2 cup sugar
    • 1/2 cup milk
    • 3 eggs
    • 2 tablespoons melted butter
  • Topping
    • 1/4 cup brown sugar
    • 1/4 cup potato starch
    • 1/3 cup gluten-free oats
    • 2 tablespoons chilled butter

Instructions

Preheat your oven to 350 degrees.

1. Slice your peaches thinly, and combine in a mixing bowl with the raspberries.  Add the cinnamon, and mix to thoroughly coat the fruit.  Pour the fruit into the bottom of a sprayed or greased 9.5″ pie plate.  Spread the fruit evenly.

2. Mix the crust’s dry ingredients, and then add the milk, eggs and melted butter.  Stir until smooth.  Pour this mixture evenly over the top of the fruit.  It will drip down through and form the crust, as well as fill in the cracks between the fruit.

3. For the topping, stir together the sugar, starch and oats.  Add in the chilled butter in chunks and cut it in with knives or a pastry cutter.  Sprinkle the resulting mixture over the pie.

4. Put the pie in the oven and cook for 45 minutes.  Let it cool before serving.  Cover in cling wrap and refrigerate.

Additional Notes

  • If you cut back on either fruit to make it fit in a 9″ plate, most people would thank you to cut back on the raspberries.  Myself, I prefer a nice tart pie, so I am heavy-handed with the raspberries.
  • Vanilla ice cream?  You betcha!  Goes great with this pie.
  • Want to try different fruit?  Substitute apples, or apples and blueberries.  Strawberries and rhubarb.  Someday I’m going to try strawberry-mango!  Invent your own variations, and drop me a note to let me know what you tried.

Tuna Pasta Casserole

Tuna Pasta Casserole

Tuna Pasta Casserole

Tuna noodle casserole was one of those meals I remember enjoying in my childhood, but now it has to be gluten free.  I start with my Gluten-Free Cream of Mushroom Soup as the sauce base, and build from there.

Ingredients

  • 1 box (10 oz) gluten-free pasta
  • 1 cup frozen peas
  • gluten-free bread crumbs and/or grated Parmesan cheese
  • Gluten-Free Cream of Mushroom Soup recipe (modified with following extra ingredients)
    • 1/2 cup milk or cream
    • 1/4 teaspoon salt
    • 2 cans tuna*, 5 oz each
    • 1/2 onion
    • 1/2 green pepper

Instructions

Preheat your oven to 350 degrees.

1. Begin by sauteing the diced onions and peppers until soft, and then include these as part of the cream of mushroom soup base.  Also, make the following modifications to the mushroom soup recipe:

  • Add 1/2 extra cup of either milk or cream
  • Add 1/4 extra teaspoon salt
  • drain the two cans of tuna and add directly to the sauce

2. Cook the gluten-free pasta according to package directions.  I wait until the pasta is just a couple minutes from done according to its “official” cook time and then toss in the frozen peas.  Let the liquid return to a boil and cook a little longer.  If you don’t want to do that, you can prepare the peas separately according to package instructions.

3. Drain the pasta and peas, mix with the mushroom sauce, and spread the entire mixture evenly in a sprayed 9×13 baking dish.

4. At this point, if I have a couple spare slices of gluten-free bread, I’ll grind them up in a food processor and mix them with some Parmesan cheese (and maybe a little salt & pepper), and then spread them evenly across the top of the casserole.  If I don’t have bread crumbs, I sprinkle grated Parmesan cheese over the top.

Put the casserole in the oven and cook for 30 minutes.

*  Use either white or light tuna; white tuna will result in a casserole which has a less “fishy” taste.

GF Cream of Mushroom Soup

If you’re making gluten-free casseroles and other gluten-free dishes, you’ve probably run up against this problem before: casseroles often call for cream soups like cream of mushroom soup or cream of chicken soup.  And this is a problem because?  Many cream soups have ingredients like wheat, or that ubiquitous and vaguely named “modified food starch.”

Cream of Mushroom Soup

Cream of Mushroom Soup

This is my own recipe for gluten-free cream of mushroom soup.  It’s a lightly spiced soup, because I want to keep it generic enough to use in different sorts of recipes, like a tuna casserole or a swedish-meatball-style goulash.  So think of this as a base that you can use for other recipes.

Your cream of mushroom soup will look creamier and less chunky than mine; this picture was taken after I’d added in extra ingredients for the casserole I was making.

Ingredients

  • 8 oz mushrooms, chopped
  • 1 cup milk
  • 1 cup heavy cream
  • 1 cup chicken broth
  • 2 cloves garlic – pressed or minced
  • 3 tablespoons butter
  • 3 tablespoons brown rice flour
  • 1/4 teaspoon pepper
  • 1/4 teaspoon salt

Instructions

1. Slice the mushrooms.  If you prefer your cream of mushroom soup like what you can buy in a can, chop your mushrooms small.  We like bigger chunks.  Saute the mushrooms in oil or butter, just for a minute or two.  Then toss in the 2 cloves of minced garlic.  The moment that garlic flavor hits your nose, you’re done.  Take the veggies off the heat and save them for later.

2. In a saucepan or a frying pan (I use a frying pan), melt 3 tablespoons of butter over medium-low heat.  Once it’s melted, add 3 tablespoons of brown rice flour, and immediately start stirring the entire mixture until it’s smooth.  It’ll feel a bit granular, but the mixture should turn a nice shade of reddish-brown, and start bubbling.  Then it’s time to add the milk.  Stir it in, and keep stirring until the mixture starts to thicken.  Then go ahead and add in the heavy cream and chicken broth.

3. When the sauce starts to bubble, turn the heat down a bit, and add the sauteed veggies, salt and pepper.  Let the soup simmer for 15 or 20 minutes, and then it’s ready to either eat, or add into whatever recipe you’re making!


Baby Popcorn?

Baby Popcorn

Baby Popcorn

Today I made baby popcorn.  Yep, that’s right!  If you don’t believe me, take a look at the picture.  Take a close look, and do a size comparison of my fingers and the popcorn kernels.  Either I have monstrously large fingers, or those popcorn kernels are really small.

So what’s the deal?  Well, the deal is that Ocean State Job Lots is running a 20% off sale on all Bob’s Red Mill products.  And since I’m doing gluten free, I get excited about those sales!  So I was browsing the enormous BRM display, getting multiple bags of sorghum flour, potato starch, and ground flaxseed, and my eye was caught by a bag that said, “Whole Grain Sorghum.”  It wasn’t ground sorghum; it was entire kernels of the grain.

On the back, there was a recipe for “popped sorghum.”  1/4 cup of sorghum in a paper bag in the microwave, or in a saucepan on the stove top.  I tried it on the stove top, because we couldn’t find any paper bags to use in the microwave.

What does it taste like?  Well, like popcorn, more or less!  Add a little salt and munch away!

Gluten-Free Bread

I developed this recipe because I don’t like (and don’t want to waste money on) the GF bread you can buy at stores, and also because I hated the fact that most recipes for GF bread are for small 8×4 pans instead of the regular 9×5 pans.  People do 8×4 because it’s less likely to fall, but if you do it right, you can do a 9×5 that doesn’t fall.

Gluten-Free Bread

Gluten-Free Bread

In a large mixing bowl mix

  • 3 cups very warm water
  • A squirt (yeah, I don’t measure this, but it’s not a lot!) of molasses.  Remember that it’s the sugars that cause browning, and since this loaf sits in the oven for a VERY long time, too much sugar results in a scorched loaf.

Add 2 tablespoons yeast, and let set for 10 minutes.  If you are using bread machine yeast, it doesn’t require the 10 minute soak.  Check the label of your yeast to find out if it needs to be dissolved.  Add the following and mix (I use a mixer on a medium speed through the rest of the recipe)

  • 1/3 cup olive oil (or other oil)
  • 4 large eggs
  • 3 tablespoons vinegar

Dry ingredients should be mixed, added to the liquids, and then mixed until the batter is smooth (In case you’re wondering why a math teacher would put amounts like “6/3 cups” instead of “2 cups,” the reason is that I use Bob’s Red Mill flour, and a 1/3 cup measure fits in the small bags nicely, so everything gets measured in thirds!)

  • 6/3 cup potato starch
  • 3/3 cup tapioca starch
  • 5/3 cup sorghum flour
  • 2/3  cup brown rice flour
  • 2/3 cup ground flaxseed
  • 2 tablespoons xanthan gum
  • ½  teaspoon baking powder
  • 1 tablespoon of salt

Preheat the oven to 375 degrees.  Divide the dough evenly between two sprayed 9×5 bread pans.  Use a spatula (sprayed with cooking spray) to smooth the tops of the loaves, and let rise for 25 minutes.  Place loaves in the oven.  Avoid putting the loaves too close to the top of the oven, as the bread cooks a long time, and this will cause the crust to overcook.

After 40 minutes, gently place a piece of tin foil over the top of each loaf, so the crust won’t burn, and raise the temperature to 425.

Allow the bread to cook for 30 more minutes.  The goal is to have the internal temp at 208 degrees, so adjust cooking times accordingly.  If you insert a thermometer, be aware that the loaf will probably fall in that spot!

A trick to help avoid fallen loaves: The loaves are very delicate at this point, and unnecessary jarring will cause them to fall.  I usually shut the oven off and carefully remove the foil, and then leave the loaves to cool down gradually in the oven before I handle them.  Once they’ve cooled for 15 or 20 minutes, I take them out, and very gently tip the pan sideways and pull the loaf out with my other hand and set it on a wire rack to finish cooling. Once they’re cooled  I refrigerate the loaves for a couple hours before slicing.  Store the loaves in airtight containers.  Once the bread is more than a couple days old, I always toast the slices before using.

Goodbye Gluten

In late 2011, I started having some unusual physical ailments – most of which I won’t trouble you with here!  I started playing around with my diet, as well as visiting doctors to see if we could figure out if I had developed an allergy of some sort.  Many experiments and doctor’s appointments later, we realized that the solution was staring us in the face: even though I don’t have celiac, or even a wheat intolerance, eating things with gluten made my system go haywire.

We didn’t know for a long time if it was wheat or gluten that gave me problems, and we kept saying “One of these days we’ll try something with barley.  If that gives a problem, we’ll know it’s a gluten issue.”  But we kept putting it off, because I was always so busy I didn’t want to have my body turn my life upside down for a few days.  Finally, in Sept of 2013, we got around to testing with some barley lentil soup.

Well, it was delicious soup, but the results weren’t pretty.  So now it’s official.  I’m saying “Goodbye Gluten!”  I love experimenting in the kitchen, so I’m developing my own recipes, which I will post here from time to time.